In this post, we’ll learn how to configure a Spring Boot application so that it uses OAuth 2.0 Bearer Tokens for authentication and authorization – powered by Spring’s Resource Server support. By the end, you’ll be able to protect any REST endpoint with JWT-based security and custom role mappings.
To make the whole thing more practical, I have prepared a very simplified example application based on Spring Boot. So you can follow every step of the series hands-on and test it directly yourself.
Before we begin, let’s make sure you have everything in place.
Prerequisites
- A running OAuth 2.0 Authorization Server (e.g. Keycloak) that can issue access tokens.
- A basic Spring Boot application with at least one REST controller. (You can use my sample one)
- Maven or Gradle build configured for Spring Security and the Resource Server starter. (See here for an example)
High-Level Flow
- User obtains an OAuth 2.0 access token from the Authorization Server.
- User calls your REST API, sending the access token in the
Authorization: Bearerheader. - Spring Resource Server validates the token, authenticates the user, and establishes authorities.
- Your API returns the requested resource if the user is authorized.
Now, let’s dive into each step in detail.
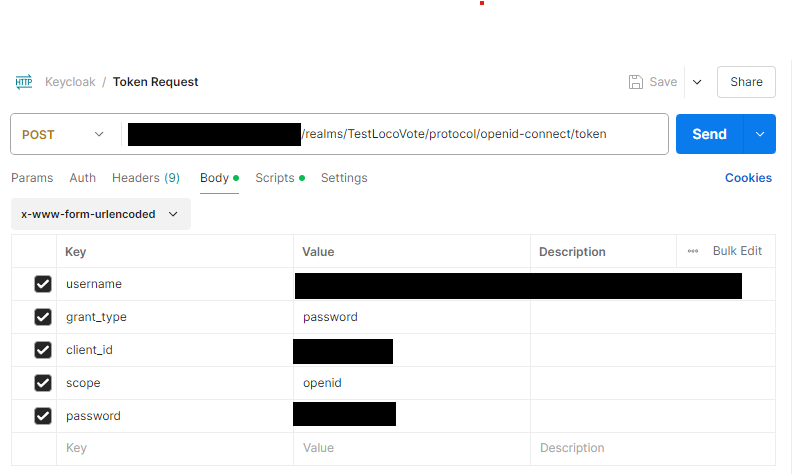
1. Requesting an OAuth 2.0 Access Token
In this example we’ll use Keycloak with the Resource Owner Password Credentials flow (for demo purposes only—use a more secure flow in production).
Token Request
Sample Token Response
{
  "access_token": "eyJhbGciOiJIUzI1NiIsInR5cCI6IkpXVCJ9...",
  "expires_in": 300,
  "refresh_token": "eyJhbGciOiJIUzI1NiJ9...",
  "token_type": "Bearer",
  "id_token": "eyJhbGciOiJSUzI1NiIsInR5cCI6IkpXVCJ9...",
  "scope": "openid email profile"
}
With the raw token in hand, we can inspect its contents to understand what claims it carries.
Decoding the JWT payload reveals:
{
  "iss": "https://.../realms/TestLocoVote",
  "sub": "...",
  "resource_access": {
    "loco-vote-test": {
      "roles": ["creator", "admin", "user"]
    }
  },
  ...,
  "scope": "openid email profile",
  "preferred_username": "giuseppe.clinaz",
  "email": "giuseppe...@...com"
}
Key claims
iss(Issuer URI) tells us who issued this token. This will be in the next section relevant.resource_accesslists the roles granted for a specific client (in our case,loco-vote-test). The token indicates that the user has thecreator,adminanduserroles for this resource. The logic used here is sufficient for our application, depending on your requirements and authorization server, you may use different claims.
2. Configuring Spring Boot as an OAuth 2.0 Resource Server
Before sending any API requests with your access token, you must configure your Spring Boot application as a Resource Server. Let’s start by adding the necessary properties.
2.1 Application Properties
Add the following to your application.yml (Have a look here for a list of configuration options):
spring:
  security:
    oauth2:
      resourceserver:
        jwt:
          issuer-uri:   ${ISSUER_URI:https://.../realms/TestLocoVote}
          jwk-set-uri:  ${JWK_SET_URI:https://.../realms/TestLocoVote/protocol/openid-connect/certs}
  jwt:
    auth:
      converter:
        resource-id: loco-vote-test
As in the documentation stated the issuer-uri can either be an OpenID Connect discovery endpoint or an OAuth 2.0 Authorization Server Metadata endpoint defined by RFC 8414. To validate JWT´s signature Spring uses the issuer-uri to perform the OpenID Connect Discovery call. In this example the url would be https://.../realms/TestLocoVote/.well-known/openid-configuration. This endpoint should return a JSON containing among other things the jwk-set-uri. Because my jwk-set-uri endpoint is located behind a proxy, I set the URI manually.
2.2 Security Filter Chain
Next, define a SecurityConfig to enforce JWT authentication:
@Configuration
@EnableMethodSecurity
public class SecurityConfig {

  private final KeycloakAuthoritiesConverter converter;

  public SecurityConfig(KeycloakAuthoritiesConverter converter) {
    this.converter = converter;
  }

  @Bean
  public SecurityFilterChain filterChain(HttpSecurity http) throws Exception {
    http
        .authorizeHttpRequests(authorizeRequests -> authorizeRequests.anyRequest().authenticated())
        .oauth2ResourceServer(oauth2 -> oauth2.jwt(
            jwt -> jwt.jwtAuthenticationConverter(keycloakAuthoritiesConverter))
        )
        .sessionManagement(
            session -> session.sessionCreationPolicy(SessionCreationPolicy.STATELESS)
        );

    return http.build();
  }
}
This configuration requires every request to be authenticated with a valid JWT.
Via the oauth2ResourceServer, we plug in a custom converter (KeycloakAuthoritiesConverter) that controls how roles map to Spring authorities. Finally, the SessionCreationPolicy.STATELESS setting tells Spring not to create or store any HTTP session.
3. Converting JWT Claims into Spring Authorities
This KeycloakAuthoritiesConverter is the heart of our custom role mapping logic:
@Component
public class KeycloakAuthoritiesConverter
    implements Converter<Jwt, JwtAuthenticationToken> {

  private final String resourceId;

  public KeycloakAuthoritiesConverter(
      @Value("${spring.jwt.auth.converter.resource-id}") String resourceId) {
    this.resourceId = resourceId;
  }

  @Override
  public JwtAuthenticationToken convert(Jwt jwt) {
    Collection<GrantedAuthority> authorities = extractAuthorities(jwt);
    String principalName = jwt.getIssuer() + "+" + jwt.getSubject();
    return new JwtAuthenticationToken(jwt, authorities, principalName);
  }

  @SuppressWarnings("unchecked")
  private Collection<GrantedAuthority> extractAuthorities(Jwt jwt) {
    Map<String, Object> resourceAccess = jwt.getClaimAsMap("resource_access");
    if (resourceAccess == null) return Collections.emptySet();

    Object resource = resourceAccess.get(resourceId);
    if (!(resource instanceof Map)) return Collections.emptySet();

    Map<String, Object> resourceMap = (Map<String, Object>) resource;
    Object rolesObj = resourceMap.get("roles");
    if (!(rolesObj instanceof Collection)) return Collections.emptySet();

    return ((Collection<String>) rolesObj).stream()
      .map(String::toUpperCase)
      .map(role -> "ROLE_" + role)
      .map(SimpleGrantedAuthority::new)
      .collect(Collectors.toSet());
  }
}
With this converter, any roles found under resource_access -> <resource-id> -> roles are mapped to Spring GrantedAuthority instances, ready for method-level security checks. Again, this behavior depends on your requirements and can be customized as needed.
4. Testing Your Secure API
Let’s verify that our setup works as expected. Consider this simple controller:
@RestController
public class HelloWorldController {

  @GetMapping("/hello")
  public String hello() {
    return "Hello World";
  }
}
4.1 Unauthorized Request
curl -i http://localhost:9090/hello
HTTP/1.1 401 Unauthorized
WWW-Authenticate: Bearer
In the response, the WWW-Authenticate: Bearer header indicates that the API expects a Bearer token in the Authorization header. To gain a detailed understanding of all filter layers in the SecurityFilterChain the documentation can be found here.
4.2 Authorized Request
- Obtain an access token from Keycloak.
- Call the API:
curl -H "Authorization: Bearer <access_token>" http://localhost:9090/hello
Hello World
Succes, your API now correctly validates tokens and returns the resource only when authorized.
5. Restricting Endpoints by Role
Fine-grained access control is available right out of the box. For example, you can restrict an endpoint so that only users with the admin role can invoke it. By injecting a JwtAuthenticationToken into your controller or service, you gain direct access to all token claims (username, roles, etc.) within your business logic.
@RestController
public class HelloWorldController {

  @PreAuthorize("hasAuthority('ROLE_ADMIN')")
  @GetMapping("/hello")
  public String hello(JwtAuthenticationToken token) {
    return "Hello World Admin: " + token.getName();
  }
}
Conclusion
By turning your Spring Boot app into an OAuth 2.0 Resource Server, you offload authentication and token management to a dedicated Authorization Server (like Keycloak) and keep your REST endpoints stateless and secure. With just a handful of properties and a custom JwtAuthenticationConverter, you can map JWT claims to Spring Security authorities, enforce role-based access.